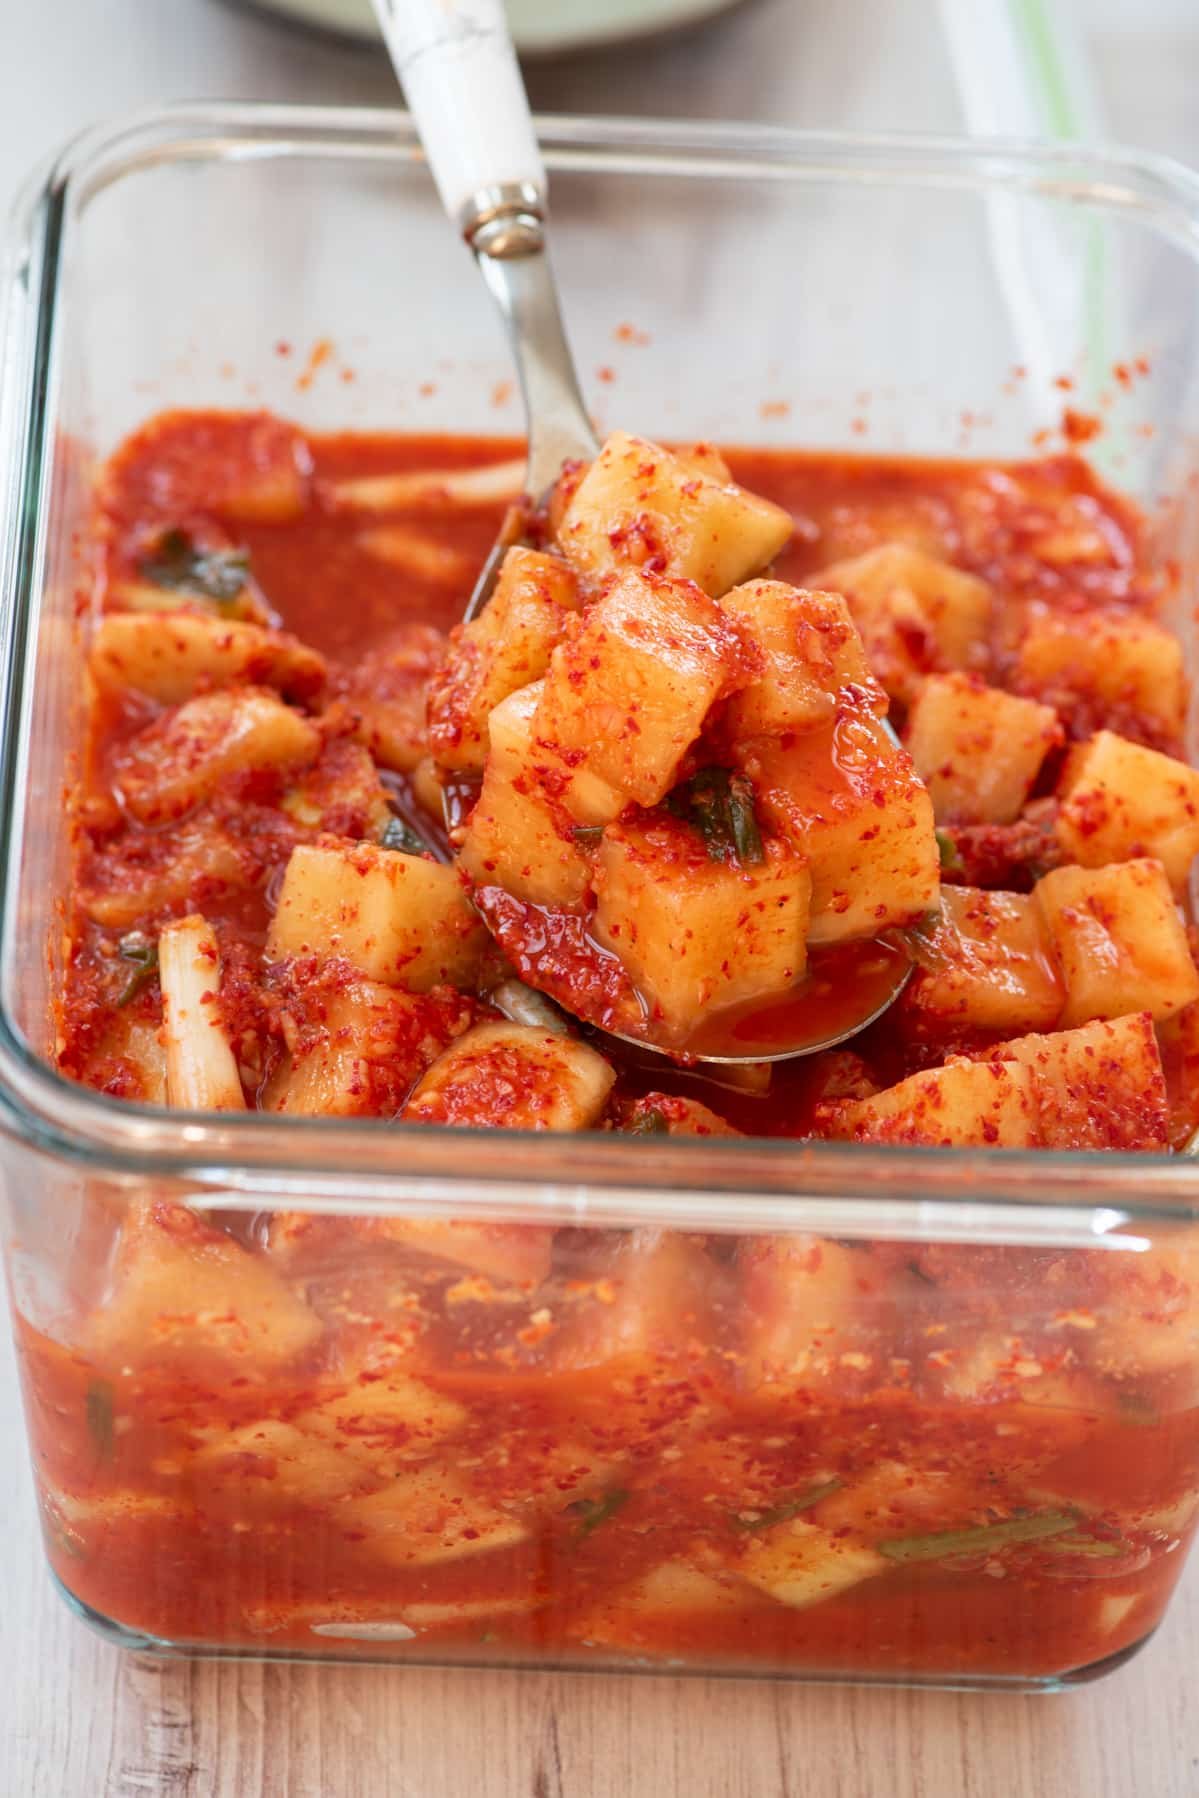
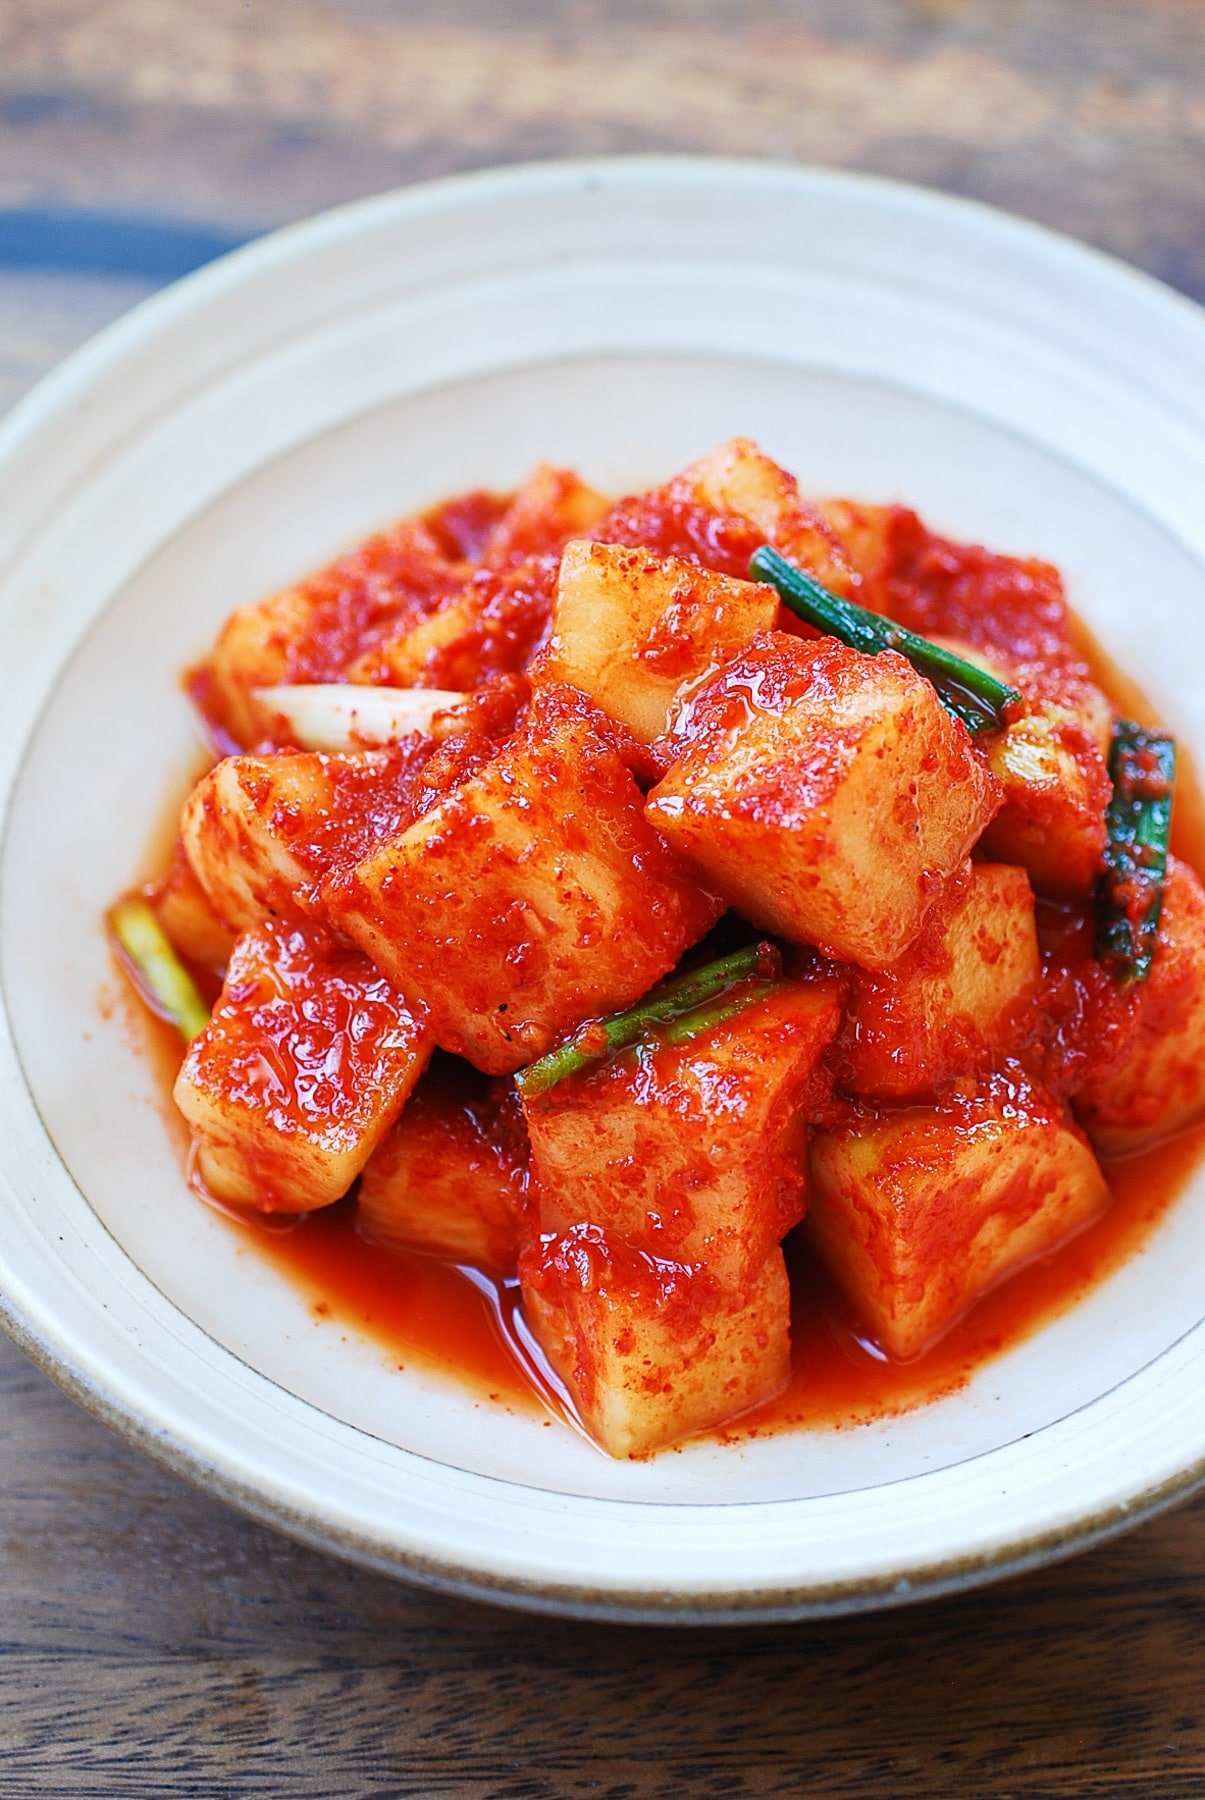
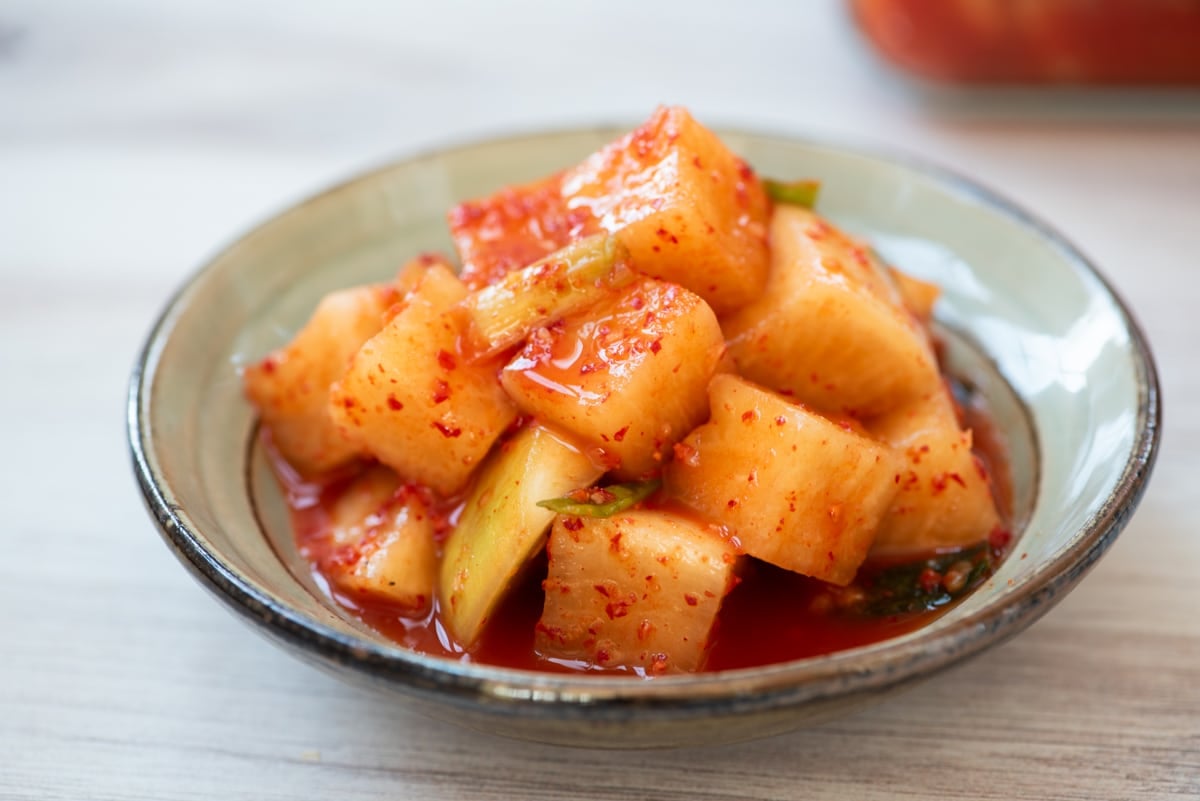
Crunchy, spicy, and deeply savory, kkakdugi is a highly popular Korean radish kimchi. And easy to make!
Kkakdugi (깍두기) is a kimchi made with Korean radish, mu (or moo, 무). The name kkakdugi comes from how the radish is cut — cubed, and it’s known as cubed radish kimchi in English.
Korean radish is a variety of white radish and has firm, crisp flesh and a slightly sweet and peppery taste. It’s a cool weather vegetable, so it tastes best in fall and winter. Summer radish can be bitter. You can add extra sweetener such as sugar and/or Korean plum syrup (maesilcheong, 매실청), if available, to balance out the bitterness.
How to make cubed radish kimchi
Ingredients
- Korean radishes, mu (무)
- Korean coarse sea salt (굵은소금)
- scallions
- gochugaru (고추가루)
- myulchiaekjeot (멸치액젓), fish sauce
- saeujeot (새우젓), salted shrimp
- garlic
- ginger
- Korean/Asian pear or apple – optional
- cooked rice (heated) – optional
- salt and/or sugar as needed
Saeujeot (새우젓, salted and fermented shrimp) and myulchiaekjeot (멸치액젓, fish sauce made with anchovies) are the classic ingredients in kimchi. These add the depth of flavors to kimchi. If salted shrimp is unavailable, you can use more fish sauce. If neither is an option, use salt to season or Korean soup soy sauce (gukganjang, 국간장) in combination with salt.
When using the optional fruit and/or rice, you can blend them together with garlic and ginger.
Cutting the radish
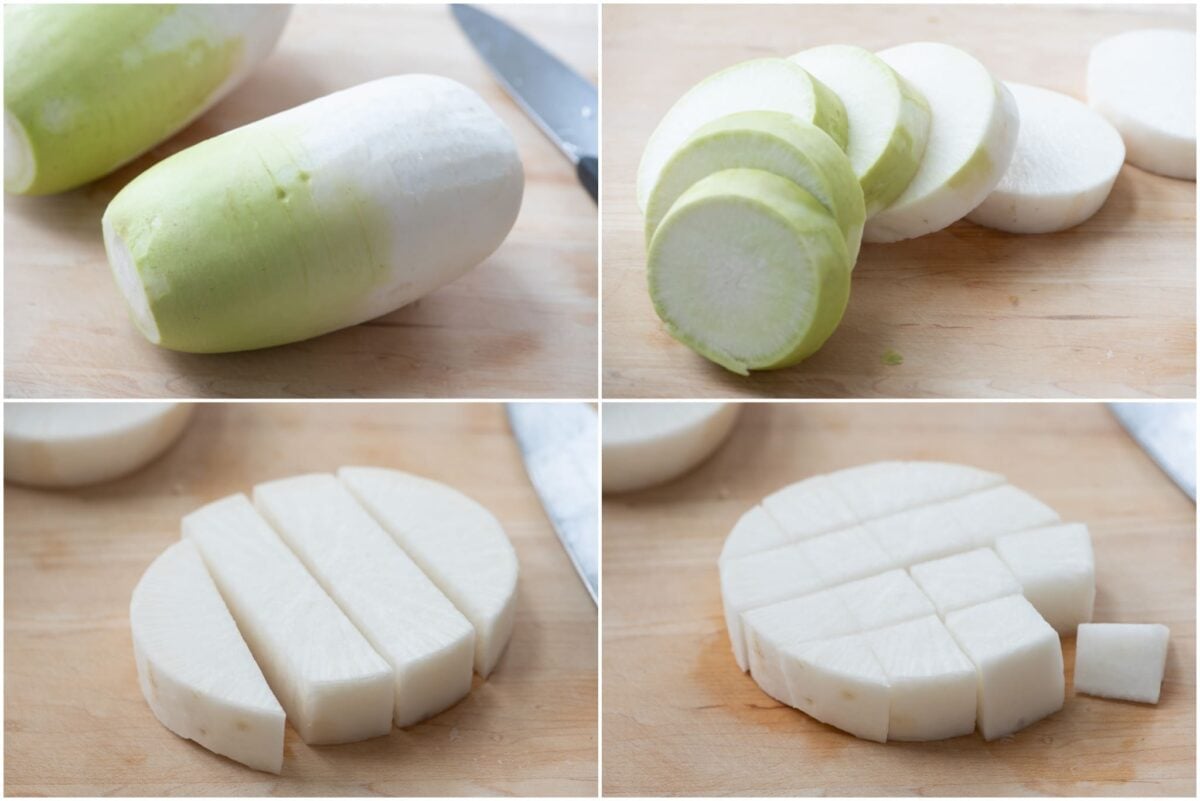
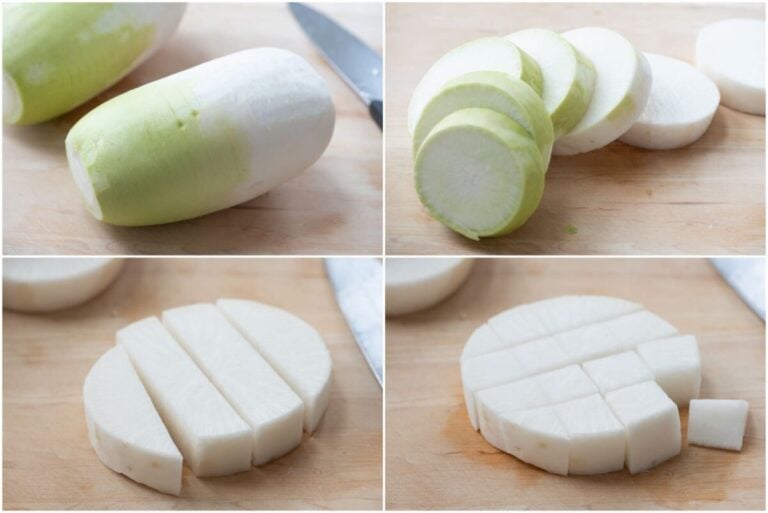
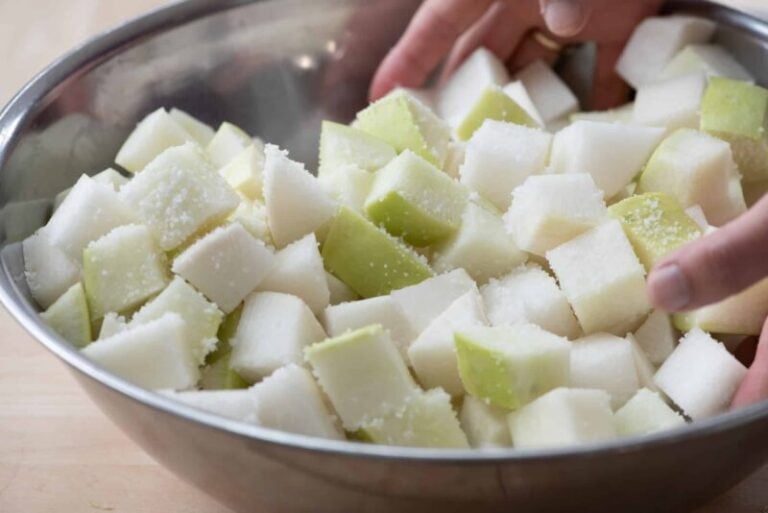
Cut the radish into 3/4 to 1-inch thick discs first. Then cut each disc into the same thickness, 3 or 4 equal sticks, depending on the diameter. Turn the whole thing 90 degrees and then cut again into 3/4 to 1-inch cubes.
Salting
Radishes are 90 some percent water, and salting draws out some of their water content for a crunchy texture of kimchi.
Koreans use coarse sea salt for kimchi, but if not available to you, use what you have. You will need to use less if using finer salt. This recipe uses 3 TBS of Korean coarse sea salt, which, for example, is approximately equivalent to 2.5 TBS of coarse Kosher salt or 2 tablespoons of Morton’s canning and pickling salt, which is very fine grain salt.
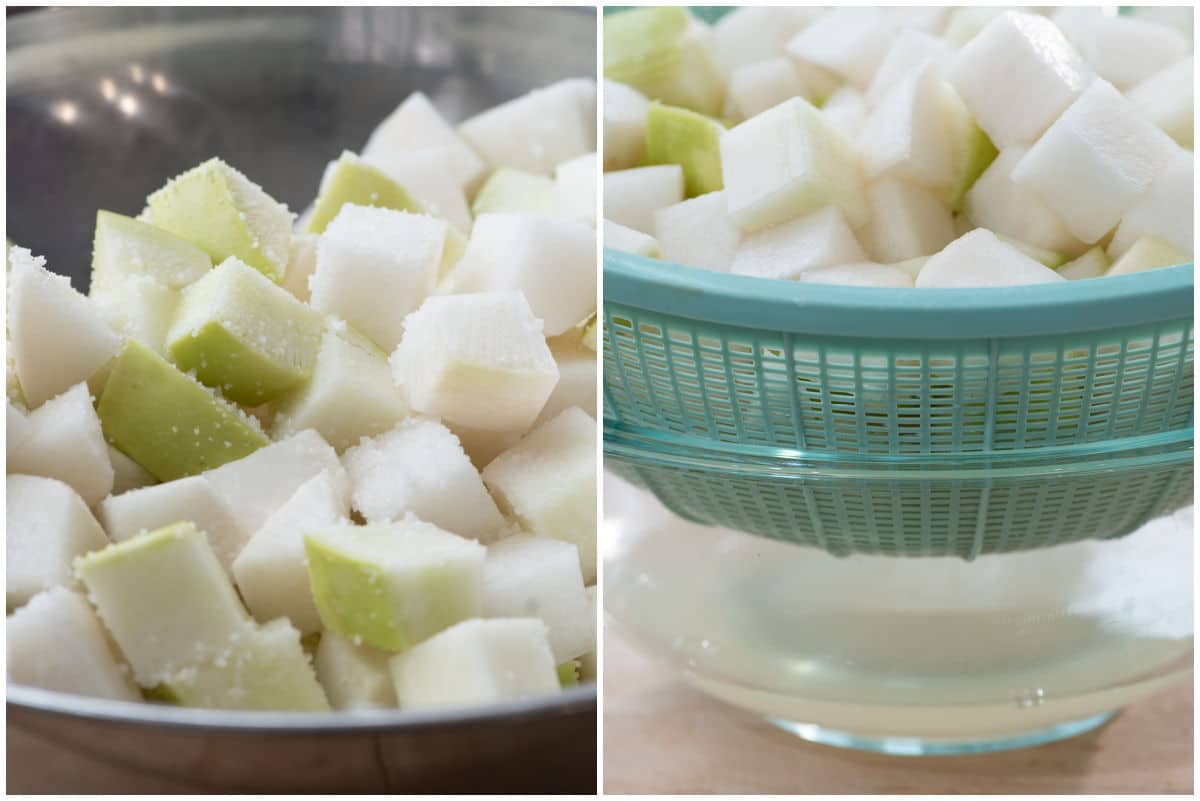
Sprinkle the salt over the radishes and toss well to distribute the salt. The moisture from the radish dissolves the salt quickly. Let it sit for about an hour, tossing them to rotate once or twice every 20 minutes or so. More salt or longer salting will draw out more water.
Draining
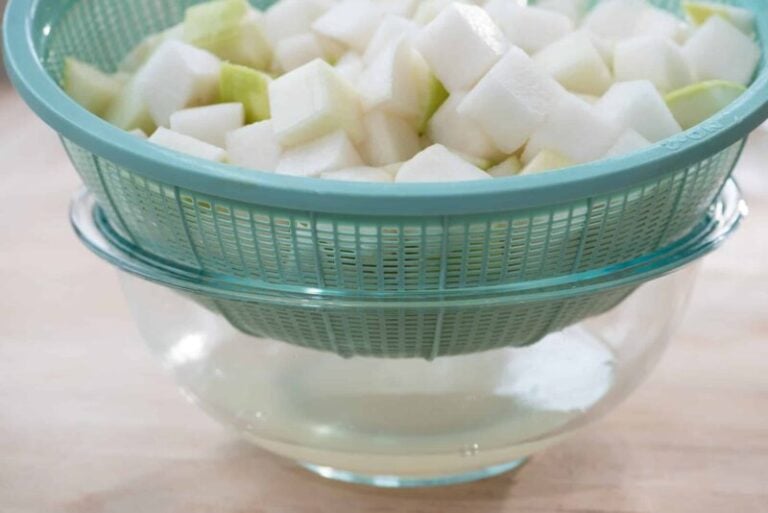
The radishes should have released quite a bit of water after being salted. Drain the radishes. Do NOT rinse them and wash off the salt on the surfaces. Discard the drained water! It’s too salty to use, because we are using other salty ingredients.
However, if you’re not using salted shrimp and/or fish sauce, reserve this salt water and use some of it to season the kimchi.
Mix with Seasonings
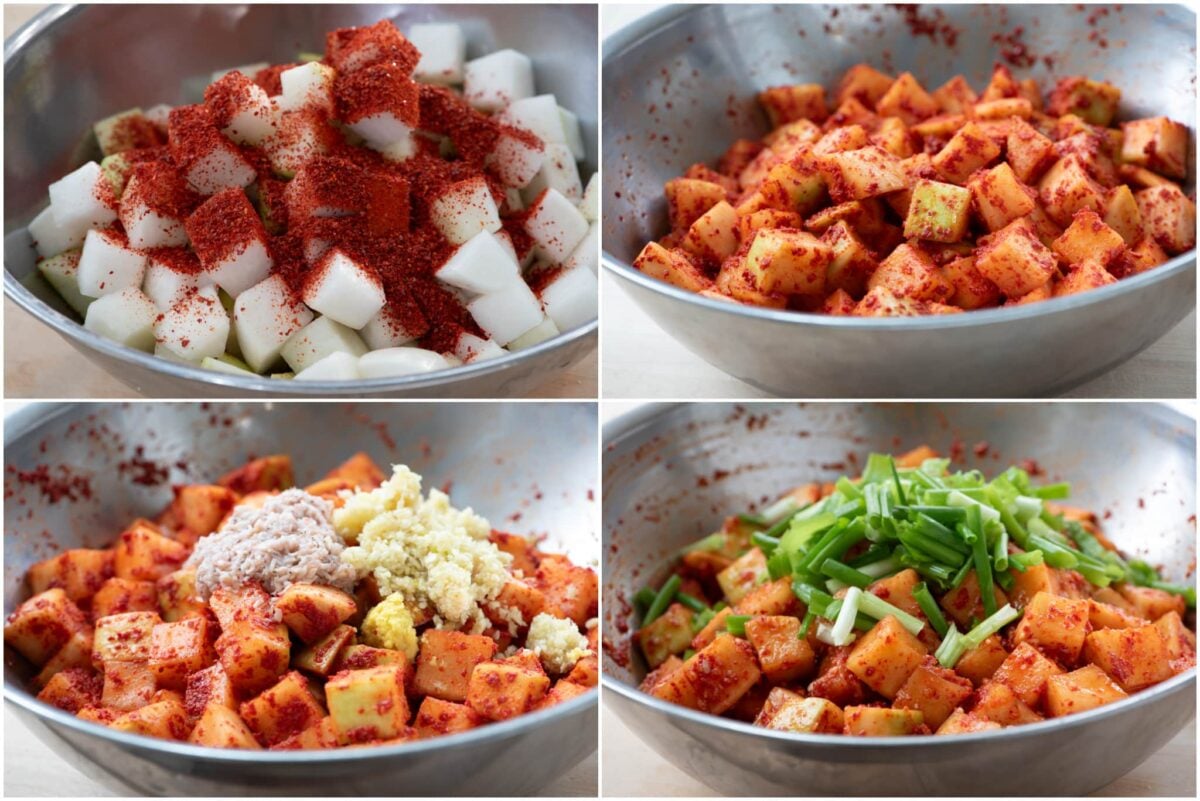
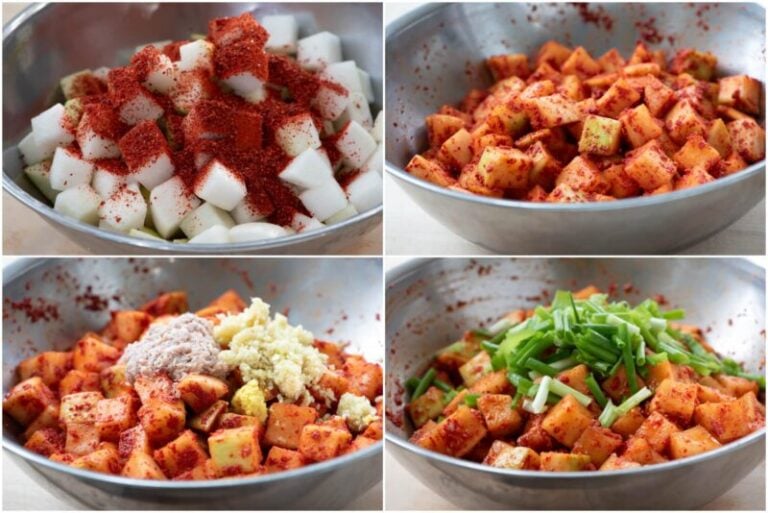
Add the gochugaru, and mix well to coat the radish cubes and rub with your hand. This gives the radish kimchi a nice red color. Then, add the remaining ingredients and mix really well before tossing in the scallions.
Storing and fermenting
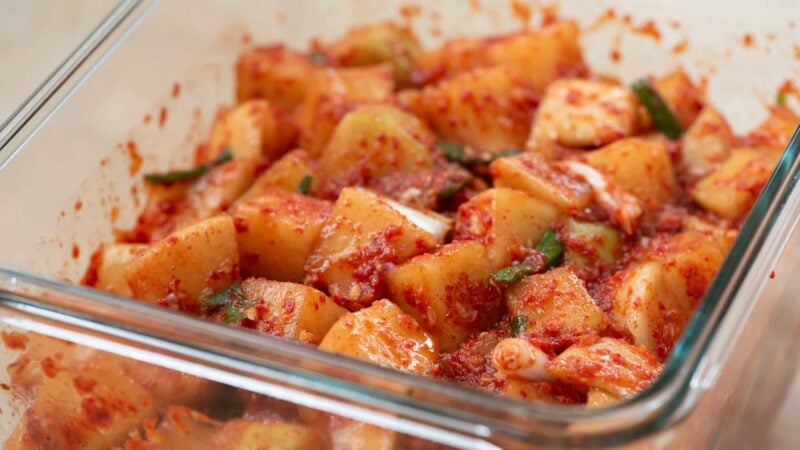
Radish kimchi takes longer to ferment than napa cabbage kimchi. Leave the kkakdugi at room temperature for 2 to 3 days during cold months, depending on your actual room temperature and how soon you want to start eating your kimchi. Then keep it in the fridge. It will continue to ferment.
You can enjoy kkakdugi with any Korean meal, but it’s especially good with a bowl of mild soup such as seolleongtang, samgyetang, galbitang, and dak gomtang. It’s a delicious side dish that will add a robust, spicy kick and some crunch to a meal!
Watch how to make it
More kimchi recipes
For more Korean cooking inspirations, follow along on YouTube, Pinterest, Twitter, Facebook, and Instagram.
Ingredients
- 5.5 pounds Korean radishes (mu, 무) See note 1
- 3 tablespoons Korean coarse sea salt (굵은소금) less if using finer salt - See note2
- 3 or 4 scallions cut into about 1-inch lengths
Seasonings
- 1/2 cup gochugaru (고추가루) use more or less to taste (a tablespoon or 2)
- 2 tablespoons myulchiaekjeot (멸치액젓), fish sauce See note 3
- 3 tablespoons saeujeot (새우젓), salted and fermented shrimp See note 3
- 3 tablespoons minced garlic, 8-9 plump cloves see note 4
- 1 teaspoon grated ginger, about 1-inch thumb size see note 4
- 1 tablespoon sugar (adjust to taste or omit) You may need more if your radish is bitter.
- 1/2 Korean/Asian pear or apple - optional see note 4
- 2 tablespoon cooked rice, heated if hardened - optional see note 4
Kitchen Tools
- a large mixing bowl 7 – 8 qt
- a large colander
- kitchen gloves
- 1 gallon or little smaller airtight container or jar
Instructions
- Clean the radishes by scrubbing with a brush and/or scratching off the stubborn impurities with a small knife. Peel the skin only if necessary. Cut into 3/4 to 1-inch thick discs, and then cut each disc into 3/4 to 1-inch cubes, placing in a large bowl. (The cubes will look big but will shrink during the salting and fermentation processes.)
- Sprinkle the salt over the radishes and toss well to coat evenly. Let sit for about an hour, until the radishes have slightly softened and released some liquid. Flip them over once or twice during salting.
- Drain the radishes in a colander and discard the liquid. Do NOT rinse. (The radishes still contain sufficient water content that will be released during the fermentation process.)
- Place the radishes back in the bowl. Add the gochugaru and mix well, rubbing the radishes by hand (wear kitchen gloves). Add the remaining seasoning ingredients and mix well to evenly distribute the seasonings. Taste a little bit of the seasoning. It should be a little too salty to eat as is. Add some salt if necessary. Toss the scallions in gently. (The radishes will be a little dry at this point, but they will release water during the fermentation process.)
- Store in an airtight container or jar. Before closing the lid, press the kkakdugi down hard with your hand to remove air pockets between the radish cubes.
- Leave it out at room temperature for two to three days, depending on your room temperature and how fast you want your kimchi to ripe. Then, store in the fridge. Kkakdugi tastes best after a week or two in the fridge to fully develop the flavors. It maintains great flavor and texture for several weeks.






Jen says
Is Mu similar or the same as Daikon?
Hyosun says
Not the same. I talk about that in the video. Hope you check it out.
Manny says
Is it still safe to consume if the liquid became slimy? I had the jar at room temperature for two days then after straight into the fridge. Today, after 1.5 weeks I noticed the liquid was thick and slimy. The daikon is still crunchy, no mold inside the jar, smell like normal, and some bubbles rising to the surface. I had some tonight but not much just in case don’t want to get sick. But in the meantime would you say it is safe to continue eating? The only thing I experimented was add a small piece of grated gala apple to it hoping to add some sweetness to it.
What do you think contributed to the slimy texture?
Hyosun says
I’m not sure what happened or what caused it. I’ve heard it happens although rare. I don’t think apple does it. It should be safe to eat.
Shivanshi Pandey says
hi!! I would like to understand the difference between musangchae and kkakdugi? seems like the recipe is the same.
Hyosun says
Although some common seasoning ingredients are used, the recipes are not the same. They are different dishes. Musaengchae is a salad like dish for which the radish is julienned. Kkakdugi is a type of kimchi that’s made to last much longer.
Aya says
Hello,
I made this recipe 2 days ago and it is so delicious. I can’t stop eating it. Thank you for sharing. ❤❤
Hyosun says
oh happy to hear that!! Easy too, right?
Betty says
Use this recipe but replace the salted shrimp to more fish sauce. After fermenting it in the fridge for 3 days, I tasted it and it is a bit on the bitter side. How do I rectify the bitterness? Can I add more sugar?
Hyosun says
Yes you can add more sugar but the bitterness will mellow a bit when it’s fully ripe. Kkakdugi tastes best when it’s fully fermented and sour. Korean radishes taste nice and sweet in the fall and winter, so you won’t have that problem.
Angela Kahl says
Instead of the shrimpy seasonings, can I use something similar to the dashima kimchi seasoning that was used in the vegan kimchi recipe? Or is there something else I could use?
Hyosun says
oh sorry I missed your question. Yes definitely!
Jina F. says
An easy recipe to get your kimchi fix! I find I liked this cubed radish kimchi in the summertime. Eat it with rice, noodles, or just even as a side dish with any non-Korean meals. It is refreshing, and has the perfect balance of salt and sweet and spice. I’ve made this recipe once using Korean fish sauce instead of the shrimp, and it came out perfectly fine. I gave a few containers away to some friends and I immediately regretted not making a bigger batch! Will definitely double the recipe next time.
Kristina says
I just tried it after week and its very good. 😀 I didnt have shrimps so I putted a bit of anchovies and more fish souce. I was a bit nervous, but it doesnt taste fishy at all. We are eating it with ramen, or fried rice. Any suggestions with what it goes well?
Have a nice day.
Kristína.
Katie says
If you live near an Hmart or similar international grocery store that has an Asian/korean section, that’s a good place to get salted shrimp if you like making kimchi. FYI…they’re teeny tiny shrimp. Like tadpole shrimp lol.
Dani says
I love your recipes! Could I put the ingredients in the blender or small food processor to make the paste? Would you recommend? Also, I have seen people make kimchi with mangoes. As I have a mango tree, love kimchi, and know that you can kimchi anything (yay!), I wanted to try. Do you think this base would work the best for mangoes or the base from a different kimchi recipe?
James Kim says
Yup definitely too salty. I left out the shrimp paste and did not add more fish sauce.
I salted the radish with coarse Korean sea salt. I would maybe cut that in half-ish and add the shrimp paste after.
Hyosun says
Did you discard the liquid after salting the radish?
Robin Doaty says
Same for me too salty and I drained and rinsed after tasting one. It was extremely salty. I used 4.4 lbs of radish too. I did let them soak for more than 30 mins though as I didn’t see anything in the instructions that said you shouldn’t. Oh well back to the drawing.
Greg says
Too salty, you say not to rinse after brining however this just ends up with extremely salty kkakdugi. Think next time will rinse.
Hyosun says
Did you drain the radishes in a colander and discard the salt liquid? It shouldn’t be salty if you did that because you’re only salting for 30 to 40 min, just enough time for the radishes get softened. What type of salt did you use?
Helen says
Will this recipe work if I wanted to cut large pieces of radish? I have eaten large ones at restaurants & are crunchier & wanted to try that. Thx!
Hyosun says
Yes, it will.
Melody says
Hi – my kkakdugi is fermenting in the fridge for Thanksgiving. I see people talking about glutinous rice powder in the comments, but I don’t see it in the recipe. Is it too late to add some? How much?
Hyosun says
Not necessary, or I would have added to the recipe! Your kkakdugi will be delicious. Enjoy!
Alisson says
Hello!
I have a little problem! I’ve made kkakdugi 5 days ago and wanted to let it sit in my kitchen at room temperature. But my mother came after me and put it in the fridge…
What should i do is it still edible? Should i remove it from the fridge?
Hyosun says
You can still put it out for two to three days, and then put it back in the fridge when it tastes ripe. It will continue to ferment in the fridge.
Anna says
Which brand of kochugaru did you use? I used the one bought by my late MIL and the radish isn’t as red.
Hyosun says
Mine comes from Korea in bulk, so I really don’t have a brand name to recommend to you. Unlike gochujang or doenjang, for gochugaru there are no big names. Usually gochugaru from Korea is high quality and much more expensive with certifications from Korean food quality control organizations.
Nurul says
Hi hyosun
If i dont use salted shrimp will it be fine? Cause in my coutry have that shrimp but not like the one in the picture so what should i do?
Hyosun says
Just use more fish sauce if available.
Danielle says
Your recipes are easy to follow and my husband and his family (korean) all compliment the side dishes I make. Thank you for sharing your great recipes with us!
Hyosun says
Aww I’m so happy to hear that! Thank you so much for using my recipes. Happy New Year!
Dee says
Hi Hyosun, I was wondering if I can use daikon radish instead of the Korean radish? Would they taste the same?
Hyosun says
Yes are they are a bit different in taste and texture, but you can certainly make kkakdugi with daikon radish if Korean radish is not available. Sorry about the delayed response.
ice says
did try this today thanx
Hyosun says
How did it go? What did you like or didn’t like about the recipe?
David Rambo says
I get hungry looking at this article! I recently discovered radish Kimchi. i didn’t know what it was,just that it was very good.The next time I bought a jar the lady at the market seemed to be impressed that I was buying this type of Kimchi.I told her it was very good,and asked her what it was made of and she told me.I certainly did not relize radishes could taste so good!
Rhoda says
I live in Hawaii and the temperature right now is about 85 degrees. How long should I leave it out if my room temperature higher?
caryn says
Awesome recipes! I’ve been printing several off to have on hand, but I can’t find the printer friendly option for this page. Am I missing it, or is it just not here?
David says
If I want this spicy and sweet, how many Tablespoons of sugar should I add?
Anonymous says
Can I add 1/2 of grated apple to this to make it sweeter and softer but yet still crunchy?
Hyosun Ro says
Yes it will.
Nia says
Is it ok if i dont use the prawn? Or can i boil the prawn first?
Hyosun Ro says
Nia – It’s totally okay not to use prawns. Don’t use cooked prawns. Enjoy!
Anonymous says
hi Hyosun, it’s Joyce again (from Aug12 post). I’ve been following this recipe to make Kkakdugi 3 times now. Each times it turns out too salty and the texture of the moo cubes goes soft after 5-6 weeks in the fridge. I used sea salt and tries to follow most of the measurements and portions. Should I wash the radish after salting or just less of the juices in the end broth? The rice flour paste/soup also comes out very thick.
I’m about to harvest my first crop of daikon from the garden. The first one I pulled out last week was about 2 ft x 2 inches thick, and we used that to make your beef & radish soup. The kids loved it so much they drank 2 bowls each, yum!
I know you’re busy, if you have time can you give me some ideas what do to with them all while they are fresh? I’ve got about 8-10 of similar size daikons to harvest, and we already have a big jar of Dongchimi in the fridge. My kids are still young, so can’t take too spicy dishes as yet. My youngest loves your Dongchimi, he can eat it by the mouthful!
Thanks again!
Joyce
Hyosun Ro says
Hi Joyce! You said “Should I wash the radish after salting or just less of the juices in the end broth?” I’m not sure what you mean by “less of the juices in the end broth”. Are you using the liquid generated by salting the radish? My recipe says “Drain the radishes in a colander and discard the liquid. Do NOT rinse.” If you’re doing this but it’s still salty, just use less salt next time. It’s okay the flour paste to be thick, but you can add more water to make it thinner.
Are you using Korean radish or Japanese daikon? Japanese daikon tends to be softer, which is not ideal for kkakdugi. Also, kkakdugi tends to get a little softer when it gets really old. If it gets too soft prematurely, it could be some ingredients or fermented too soon at the high temperature. I’ve heard some bad gochugaru does that too.
It’s so cool you grow radishes in your garden. Are they Korean radish? Have you made mu namul? How about mu saengchae? Both are on this blog. Also, you can cut them up into finger sizes and dry them. Koreans do that to preserve radish for later use. You can simply soak them later and make “muchim” with spicy seasoning. I haven’t posted a recipe for that yet, but it’s on my list.
Hope this helps. Thanks always for using my recipes and providing feedback!
Megan T says
anyunghaseyo, hyosun! why does gochukaro have an expiration date on the bag? Does it really expire, and if so, what happens to it? I have some that a friend gave me when she moved, but it is a few years past the expiration date! Your thoughts are appreciated. Thank you!
Hyosun Ro says
Gochugaru doesn’t taste good if it’s that old. The color is probably bad as well. The fresh gochugaru will keep well for a couple of years in the freezer. You can try to use it and see if it tastes okay. But, a few years is a long time for gochugaru. Sorry this may not be a good news for you. Cheers!
Anonymous says
Hi Hyosun,
I tried making this 2 days ago and it came out bland. When I tasted it before letting it sit to ferment it was perfect. After placing it in the fridge for a day then taste it again, the kimchi was bland and not salty enough. Is there anything I can do at this point to correct it? Or should I add more salt next time when making a new batch? Thanks!
Hyosun Ro says
You can add some fish sauce or salted shrimp (or salt) now – the sooner is the better. Also, the flavor will develop during the fermentation process, so it will taste better even without more salt. Remember next time that the kimchi seasoning should be a bit too salty to eat as is at first. The salt level will diminish during the fermentation process. Hope this helps. Let me know if you have any other questions. Cheers!
kathy says
Hi Hyosun,
I bough some salted baby shrimp earlier this year. There was no expiration date on the jar. Do you know how long I can keep it in my fridge?
Hyosun Ro says
Hi Kathy – It should last long (months), especially if it was unopened. You can tell by its color and smell. If it turned yellowish and smells funny, then don’t use it. It stays fresh longer if you keep it in the freezer. Hope this helps.
jenn says
The high temperature must have been it! I left it out for a day and a half and it was really hot…wow. Darn it! I love your recipe though and my mom thinks it’s perfect as well. Thank you so much! Love your blog!
jenn says
Hi! I actually made this three times and twice it turned out perfectly! But the third time, the cubes got too soft even before I put it in the fridge! I was wondering if you knew why that happened. I thought I did everything exactly…Please help!
Hyosun Ro says
Hi Jenn – If you used all the same ingredients and your radish was good to begin with, it might be that it wasn’t salty enough or being left out at high room temperature too long, i.e., I’ve heard some bad gochugaru does that too, not sure that’s true. Do you think any of these apply? Please let me know. Thanks!
Anonymous says
hi Hyosun, great pictures and instructions on your site. I made the Kkakdugi yesterday and it smelled and tasted so good I ate it with dinner. I think the raw prawn and shrimp paste was not fully fermented, it gave me a grumbly tummy all night. How long should I leave it out to ferment before it is safe to eat? I left it out all day today. Also, I didn’t put enough pepper flakes in, can I add more at this stage?
My whole family have now adopted korean food and the banchan’s are great for busy working mums like me to ensure our kids get a variety of veges every night. Keep up the good work!
Joyce
Hyosun Ro says
oh also you can add more pepper flakes now. The sooner is the better.
Hyosun Ro says
Hi Joyce – Thank you so much for the good words. You can leave it out for about 2 days, then put in the fridge. It’s best to ferment it slowly in the fridge. Wait a few days before start eating. You can omit raw shrimp next time if you’re sensitive to it.
Hyosun Ro says
Hi Joanne, how are you? Thanks for trying out my recipes. I am not sure how salty it is, but should get better as it ferments and releases more water. It will be much better when fully fermented, so you can leave it out more to expedite the process. However, if you think it is way too salty, you can add some water to dilute it a little now. Also, you can use it for kimchi jjigae or dice them up for kimchi fried rice, etc., when fully fermemnted, if it’s still too salty. Did you use coarse sea salt? Hope this helps. Please let me know how it turns out. Happy New Year!
Anonymous says
Hi Hyosun, Happy New Year to you too! I added more water and it turned out just right! I did use coarse sea salt but perhaps I was too overenthusiastic in salting the radish =P Thanks for the tip and have a great day ahead!
Joanne
Hyosun Ro says
Hi Joanne – Happy to hear that. Thanks for letting me know. Happy cooking!
Anonymous says
Hello Hyosun, greetings from Singapore! I made baechu kimchi and kkakdugi today and they both look pretty well, so thanks for the awesome recipes! I have one question though, I worry that my kkakdugi paste is too salty, is there any way I can do to salvage it? Thanks and have a great day! =)
Joanne
Sissi says
Hyosun, I have made your radish kimchi and it is excellent! Thank you for the wonderful recipe (I have slightly modified it, but I hope it’s still komchi 😉 )
Hyosun Ro says
Sarah – Kkakdugi is so good with sullungtang. Thanks for visiting! Hope you try to make this at home one day.
Biren – I saw your kkakdugi on your blog. It looked great! Thanks for visiting.
Tasting Korea – Thanks!
tastingkorea says
This blog has been featured on Tasting Korea:) Please check it out.
Biren @ Roti n Rice says
I enjoy kkakdugi and it is the first kimchi I learned to make from a cookbook using salted shrimp. I now know why my friend who lives in the UK call radish mooli 🙂
Sarah says
This post is making my mouth water! I just ate some kkakdugi last week with a steaming bowl of sulluntang at a hole in the wall restaurant in Los Angeles. My mom used to take the family there when I was young, and now that I live in LA, I am spoiled with plentiful Korean food and grocery stores. It’s time to start learning to make it myself. Thanks for the recipe!
Hyosun Ro says
Andrea – Hope you get make them soon. Thanks for visiting. Have a wonderful Thanksgiving with your family!
Cooking Gallery – Try with other daikon varieties if you can find. Thanks for visiting!
Sally Chung says
Hi Ms. Hyosun
I followed the recipe but my kakdoogi taste bitter. What did I do wrong?
Hyosun says
Hi Sally! My guess is that the radish was bitter. Did you use Korean radish? Did you taste it when cutting it? Bad salt or gochugaru can do that also. If the radish is bitter next time, try adding some sugar when salting the radish.
Cooking Gallery says
I love kimchi but I have never tried radish kimchi. I don’t know where to get Korean radishes in Germany…:(. I can imagine that this radish kimchi must be so crunchy and yummy!
Andrea@WellnessNotes says
I had almost forgotten that radish is in season! Thanks for the reminder! We love kkakdugi (but I hardly ever make it myself) as well as mu guk. I’ll put both of them on “the menu!” 🙂
Have a wonderful Thanksgiving!
Hyosun Ro says
Anonymous – Please see the note under glutinous rice powder under ingredient for how to make the paste. Thanks!
It is raw minced shrimp that’s added to the kimchi, and due to salt content in kimchi, the shrimp will ferment during the fermentation process. Thanks!
Hyosun Ro says
Charles – I revised it a little to show it’s glutinous rice powder you buy, not paste. Hope you try this recipe and let me know how it turns out. This is how I do it every time, and the result is always great.
Holly – I love ox tail soup with kkakdugi too! Then again, who doesn’t?
Sissi – You nailed it! The quality of Korean red chili pepper flakes is actually the most important factor for great kimchi.
Jesica – Thank you! Hope you get to make your own!
Nami – Thank you! White kimchi is pretty much kimchi without red pepper flakes. It’s very refreshing, and I make it sometimes. I hope to post it soon.
Anonymous says
So you leave the minced or ground fresh shrimp raw or cook it? Thanks.
Jesica @ Pencil Kitchen says
ooooohh I love these! Just love them …. Could eat them with rice all day long.
Nami | Just One Cookbook says
Oh I have one question Hyosun! My Korean friend always bought me “white” kimchi because he knows I don’t eat spicy kimchi. Do you know how to make it? I enjoy it very much. I will need to learn eating spicy food though. This is so beautiful! My mom will be very happy if I make this for her. =)
Anonymous says
thank you for this recipe! however how do you make glutinous rice paste?
Sissi says
I love kimchi! I have even made it twice, but every time something went wrong and it wasn’t perfect. I guess this is the kind of preparation which gets better with practice. Having real Korean chili counts a lot too.
Your kimchi looks perfect! I think I know what my next Korean dish will be;-) (Especially since I discovered last week a shop selling big bags of Korean chili!)
beyondkimchee says
Hi Hyosun
Kkakdugi/radish kimchi makes me crave for a pot of nice beef-the ox tail bone marrow(?)-soup. It was the ultimate Korean winter comfort meal as a child.
Thanks for sharing.
Charles says
This looks amazing – I’ve been able to recreate cabbage kimchi, with varying degrees of success, but the times I’ve tried radish kimchi have been disastrous. You make it look very easy, although I’ve never seen “glutinous rice paste” – I’ll need to check one of the Korean supermarkets in Paris for this stuff! Thanks for sharing this 🙂
Hyosun Ro says
Azusa – Thank you! My family and friends love my kkakdugi. Hope you like it too.
Azusa says
Kkakdugi is my absolute favorite and I’m definitely trying this. Thanks for the step by step!